Hey Ladies!
So it has been forever since I posted! I, however, have a review for you today! I have been shopping insanely at the drugstores lately, and I came across a product I had to share with you!
The Revlon Age Defying Spa Face Illuminator in Pink Light!
So the name will first of all turn you off to this product in an instant. It sounds like it's for old grannies. But trust me, this product will not make you seem like you're ready to be shipped to the old folks' home. It makes your skin absolutely radiant! It gives you the perfect glow! The price is a bit expensive for a drugstore brand, but it comes with a ton of product (the same amound as their foundation), and the quality is really quite excellent. The product comes straight onto the brush (which is attached to the product) and you simply sweep it on. I found that it tends to apply a lot of product, and that it was easier to simply apply a few dabs and blend. Applying it to your cheekbones, down your nose, and the jawline gave my skin a pretty, dewy, glowy look. The colors are very flattering as well. I have olive toned skin, and chose the pink only out of curiousity. Usually, pink illuminator would look horrid on me, but it was absolutely perfect! It didn't wash me out at all!
So if your skin has been suffering from the winter blues, this product is a most-try! Trust me, you will not be disapointed!
Many more hugs&misses to come!
XOXO:
tu amie
Friday, February 25, 2011
Saturday, February 5, 2011
Victoria's Beauty Secret...

Hey Ladies!
So if you've ever been in a Victoria's Secret (and I'm betting that 90% of you have), you would notice the MASSIVE beauty section on one half. Lotions, sprays, an entire makeup couter where you can try products on, and cheerful salesgirls just waiting to encourage you to try one of their products. With all the pictures of VS Angels hanging around, wearing their makeup, it definitely encourages you to want to try their products (because come on, who DOESN'T want to look like Miranda Kerr or Alessandra Ambrosio?).
Well, I decided to test one of their makeup products. The product I tried was the Shimmer Lights Eye Kit.
For $15 you get 6 eyeshadows, 1 gel eyeliner, and 1 highlighter. Sounds great, right? I have to admit, I was a bit hesitant, but for $15 you can't really go wrong. I tested the eyeshadows directly with an eyelook. I primed my eyes with Nars Eye Primer (its just what I had around at the time, no specific reason for the choice), then used the included eye guide to create the look they suggested. On the other eye, I created my own look. So what was the consensus?
Eye shadows-Colors were very pretty, nice and soft, they are quite subtle but in a good way. I found them to be a bit chalky but they still applied well. Make sure you use a good primer though, or else I can't see them staying or applying very well.
Gel Eyeliner- Good. Actually much better quality then I expected. My tip to you? Warm the color my swishing your brush around in it a bit before applying, it makes it glide better.
Highlighter-It was a creme highlighter, which I thought to be a bit weird. However, I really found myself liking it. It gave a nice, dewy look under my brows, which added to the overall very subtle affect of the entire look. If you don't like that its a creme, there is nice, shimmery white in the eyeshadows that you could use as a highlighter as well!
Overall, I was quite pleased. I think that for $15, you really can't go wrong. Don't expect it to be a super bold palette. The colors apply softly so its subtle, but I still really love the entire palette. My advice to you? The next time you're at a Victoria's Secret, pick one up! It's worth it to try!
Good bye for now my angels!
Many more hugs&misses to come!
XOXO-
tu amie
PS: if any of you try out the Bronze Tropics colors, let me know if you like them and/or include a picture of you trying out either of the looks!
Wednesday, January 26, 2011
Healthy Beauty Trick!
Hey Ladies!
So lots of you, especially those in the teenage bunch, suffer with breakouts. Whether its chronic acne or just the occasional blemish, a beakout can cause any woman's self esteem and confidence to drop. A few weeks ago I was at the derm with a friend who has been having some issues with breakouts lately. You know what the derm told her to do to help prevent and clear up some of her breakouts?
CLEAN HER MAKEUP BRUSHES!
I was totally surprised. I know that it's one of the crucial beauty rules (and one of the most broken as well), to clean your makeup brushes regularily, but I never really connected that it could be guilty of exaserbating someone's breakouts. So why have I not shared with you this tip before now? Well, we wanted to see if it would actually work. For three weeks she treated her skin the same, yet she cleaned her brushes with a Bareminerals Well-Cared For Brush Conditioning Shampoo
The changes were amazing! The amount of new breakouts that showed up was significantly less, and her currently breakouts improved a bit. What was the overall biggest difference? The tone of her skin had improved so much! It feels cleaner and softer, and the combination aspect of it has lessened!
Do your skin a favor and clean your brushes with a good brush cleaner once a week! Your skin will improve, and your brushes will stay in better shape, lasting you much longer!
Many more hugs&misses to come!
XOXO:
tu amie
So lots of you, especially those in the teenage bunch, suffer with breakouts. Whether its chronic acne or just the occasional blemish, a beakout can cause any woman's self esteem and confidence to drop. A few weeks ago I was at the derm with a friend who has been having some issues with breakouts lately. You know what the derm told her to do to help prevent and clear up some of her breakouts?
CLEAN HER MAKEUP BRUSHES!
 |
| ($14, though you can get it for around $6 at amazon.com. Check it out! http://www.amazon.com/s/?ie=UTF8&keywords=bare+minerals+brush+cleaner&tag=googhydr-20&index=aps&hvadid=3931822431&ref=pd_sl_81af2jbuhl_e ) |
The changes were amazing! The amount of new breakouts that showed up was significantly less, and her currently breakouts improved a bit. What was the overall biggest difference? The tone of her skin had improved so much! It feels cleaner and softer, and the combination aspect of it has lessened!
Do your skin a favor and clean your brushes with a good brush cleaner once a week! Your skin will improve, and your brushes will stay in better shape, lasting you much longer!
Many more hugs&misses to come!
XOXO:
tu amie
Saturday, January 22, 2011
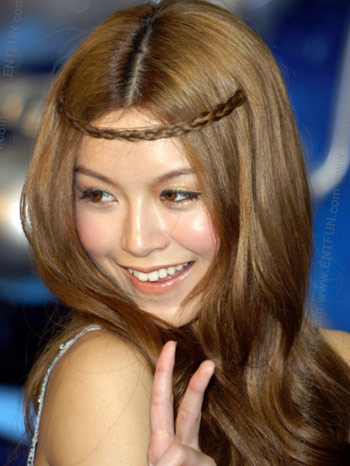
Taylor Swift Curly Qs! (A Heat Free Curl Tutorial that Actually Works)
Hey Ladies!
Don't deny it. You love Taylor Swift's hair.


Whether or not you have naturally curly hair and she made it stylish for you to go natural, or you have straight hair and spent hours frying your hair to try and get her perfect ringlets, I have the perfect solution: bendy curlers. When I was 11 I discovered these in the back of the bathroom shelves. What you're supposed to do: heat them up, then twist your hair around them, bend them into a circle, wait, then take them out and have curls! Well, I, of course, didn't have any idea how to use them, but I definitely did use them. My mom of course told me I was doing it wrong and showed me the correct way, and therefore giving me a Shirley Templesque hairstyle. When Taylor Swift first came on the scene, however, everyone was making tutorials. All the heat free ones had you braiding tons of little braids across your head (and waking up with frizzy crimps), yet I didn't want to continue using a curling iron to get her curls. So I looked through the closet and guess what I found? The old bendy curlers. I spent a bit playing with them and eventually found the perfect heat free Taylor Swift hair tutorial! Enjoy!
1. Start with wet hair. Apply an antifrizz serum and brush through.
2. Apply a curl gel throughout your hair. Flip your hair into a towel and wait 1-2 minutes.
3. Take out your hair. It should not be tangled yet it should have some wave at the root. If not, scrunch a bit at just the roots to get some volume and definition.
4. Take your bendy curlers, and start to wrap a small section of hair around the curler (if your bendy curlers have a hole at the top, like mine do, slide the hair through the hole first, sliding the curler to the top, then wrap), like you would to get a ringlet around a curling iron.
5. Do this for your entire head. For your bangs, or front layers, (short bangs will need to be side swept or even pinned back, and she has longer bangs), wrap them facing away from your face, and make sure to start a bit lower, and she has a soft sweep.
6. Spray all over with a bit of finishing or hair spray.
7. Get your beauty rest!
8. When you wake up, take the curls out. Before you separate at all, apply and bit of serum, gel, hairspray, etc to help keep the shape silky and shiny.
9. You will most likely have big, separated ringlets all over your head. Break the ringlets up a bit, to help get her curl size. Play with them and adjust them to your liking.
10. Spray the whole hair with hairspray and you're good to go!
Quick Tip: If you want to get a bit of Taylor in your hair very quickly, the night before, wash your hair, scrunch the roots and top part of your hair with gel and wrap just the front sections/ bangs on each side around the curlers. When you wake up, you'll have the texture at the top with the curled tendrils at the front. Gather the rest of your hair into a messy bun, leaving some of the tendrils out to frame your face as Taylor always does. Spray, and you're good to go!
Like this:

Switch it Up:
Brush out the curls with a wide comb slightly. As long as you wrap them all in the same direction, you'll get softer waves. Like this:

Hope this helps some of you, try it out and tell me how it goes!
Many more hugs&misses to come!
XOXO:
tu amie
PS: Always try out a heat free hairstyle before a big event, just to make sure it'll work!
Don't deny it. You love Taylor Swift's hair.
Whether or not you have naturally curly hair and she made it stylish for you to go natural, or you have straight hair and spent hours frying your hair to try and get her perfect ringlets, I have the perfect solution: bendy curlers. When I was 11 I discovered these in the back of the bathroom shelves. What you're supposed to do: heat them up, then twist your hair around them, bend them into a circle, wait, then take them out and have curls! Well, I, of course, didn't have any idea how to use them, but I definitely did use them. My mom of course told me I was doing it wrong and showed me the correct way, and therefore giving me a Shirley Templesque hairstyle. When Taylor Swift first came on the scene, however, everyone was making tutorials. All the heat free ones had you braiding tons of little braids across your head (and waking up with frizzy crimps), yet I didn't want to continue using a curling iron to get her curls. So I looked through the closet and guess what I found? The old bendy curlers. I spent a bit playing with them and eventually found the perfect heat free Taylor Swift hair tutorial! Enjoy!
1. Start with wet hair. Apply an antifrizz serum and brush through.
2. Apply a curl gel throughout your hair. Flip your hair into a towel and wait 1-2 minutes.
3. Take out your hair. It should not be tangled yet it should have some wave at the root. If not, scrunch a bit at just the roots to get some volume and definition.
4. Take your bendy curlers, and start to wrap a small section of hair around the curler (if your bendy curlers have a hole at the top, like mine do, slide the hair through the hole first, sliding the curler to the top, then wrap), like you would to get a ringlet around a curling iron.
5. Do this for your entire head. For your bangs, or front layers, (short bangs will need to be side swept or even pinned back, and she has longer bangs), wrap them facing away from your face, and make sure to start a bit lower, and she has a soft sweep.
6. Spray all over with a bit of finishing or hair spray.
7. Get your beauty rest!
8. When you wake up, take the curls out. Before you separate at all, apply and bit of serum, gel, hairspray, etc to help keep the shape silky and shiny.
9. You will most likely have big, separated ringlets all over your head. Break the ringlets up a bit, to help get her curl size. Play with them and adjust them to your liking.
10. Spray the whole hair with hairspray and you're good to go!
Quick Tip: If you want to get a bit of Taylor in your hair very quickly, the night before, wash your hair, scrunch the roots and top part of your hair with gel and wrap just the front sections/ bangs on each side around the curlers. When you wake up, you'll have the texture at the top with the curled tendrils at the front. Gather the rest of your hair into a messy bun, leaving some of the tendrils out to frame your face as Taylor always does. Spray, and you're good to go!
Like this:
Switch it Up:
Brush out the curls with a wide comb slightly. As long as you wrap them all in the same direction, you'll get softer waves. Like this:
Hope this helps some of you, try it out and tell me how it goes!
Many more hugs&misses to come!
XOXO:
tu amie
PS: Always try out a heat free hairstyle before a big event, just to make sure it'll work!
Wednesday, January 19, 2011
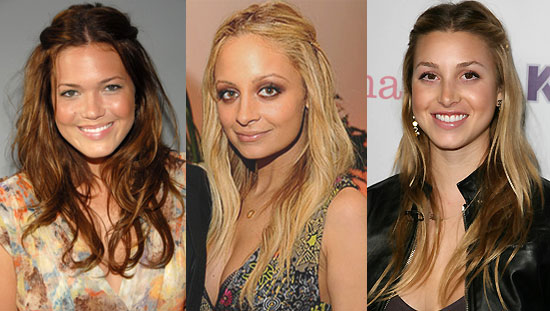
Are We Braid Obsessed?
Hey ladies!
So its quite obvious that 2010 was the year of the braid. Everywhere you looked there were french braids, fishtails, snake braids, even just the plain 'ol regular braid you learned to do while practicing on your best friend during school assemblies. I, personally, loved the trend! It was a great way to keep your hair out of your face, and was a bit more unique then a plain clip. To help keep this trend alive during the New Year, I have highlighted a couple of cute braid trends with quick instructions on how to do each one. Happy Braiding!
1. This can be worn as a bun, ponytail, side pony, whatever. Start by applying serum/gel to give the hair hold and keep it frizz free.
2. Part hair in the center (you can also do this with a side part if you wish)
3. Begin french braiding each side, stopping when you reach the end of your head.
4. Take each remaing side of hair, and secure in whichever style you wish! (If you are doing a high pony, you will want to stop the braids sooner, as the style will rest higher on your head)!
5. You're done!
tu amie
So its quite obvious that 2010 was the year of the braid. Everywhere you looked there were french braids, fishtails, snake braids, even just the plain 'ol regular braid you learned to do while practicing on your best friend during school assemblies. I, personally, loved the trend! It was a great way to keep your hair out of your face, and was a bit more unique then a plain clip. To help keep this trend alive during the New Year, I have highlighted a couple of cute braid trends with quick instructions on how to do each one. Happy Braiding!
 |
| Half-Up Braid 1. This style can be done in a few ways, with either regular or french braids. 2. Part your hair in the middle for a boho look, or the side for a neater style. 3. Apply shine serum or gel to the front areas. 4. Start either french braiding or a regular braid on the front 1-2 inch section of hair (or your fringe/bangs if they are long. If they are short, I would leave them out and start behind them). 5. Braid to the ends. Then, take both sections and secure them to the back of your head with crossed bobbies, a clip, or a mini claw clip. Let the braided ends that are not above the pins fall loose. 6. You're done! |
 |
| Braided Bun |
2. Part hair in the center (you can also do this with a side part if you wish)
3. Begin french braiding each side, stopping when you reach the end of your head.
4. Take each remaing side of hair, and secure in whichever style you wish! (If you are doing a high pony, you will want to stop the braids sooner, as the style will rest higher on your head)!
5. You're done!
 |
| Braided Boho Headband 1. Part your hair how you wish it to lie. 2. Find a section of hair (size depending on how large you want the band) underneith your hair about 2-3 inches from your roots. Braid it. 3. Pull the hair out, and pull it across your forehead, like a boho band. Pin it to the other side. 4. Arrange your hair to cover the clip or bobby and any gaps. 5. You're done! |
| Braided Headband 1. Part hair how you wish it to lie 2. Take a small section of hair (the thickness depends on how thick you want your headband) from behind your ear. Braid it. 3. Bring the braid out from behind your ear, separating the hair very slightly so it can be brought up. 4. Pull the braid over your head, like a headband. Pin it on the other side, arranging some hair to fall over the clip or bobby. 5. Arrange the hair to hide any gaps, and to fall just so. 6. You're done! |
 |
| The Lauren Conrad 'Bang Braid' |
1. Run a bit of gel or shine serum throughout the front section of your hair (your fringe, bangs, whatever you want to call them)
2. Start a frrench braid very close to the part, staying on your head and continue until you reach the edge of your eyebrow area (approx).
3. Then take the braid and remaining ends and pin them to the side of your head, either crossing two bobby pins, using a clip, or a mini claw clip.
4. You're done!
These styles were all styles that had braid detailing, not braids that took the whole hair. Loose side fishtails braids and such were very popular as well, so feel free to try them out! If you want a how to guide on them just let me know!
Many more hugs&misses to come!
XOXO:tu amie
Monday, January 17, 2011
Liliac Garden: A Makeup Trend and Tutorial
Hey Ladies!
In honor of MLK's birthday I have a very special new tutorial and trend for you! (And no, this is not related to MLK at all, I just thought it would be nice to do something a bit special!)
Liliac cheeks and lips are practically my new obesession. However, it is a bit of an out there look for some, which is why I have found the perfect solution. A lilac and pinky look mixed with a bit of gold. Pretty and yet still very trendy, since lilac cosmetics have been seen everywhere lately!


Gorgeous, right? So let's get started:
1. Start by applying your regular foundation routine.
2. Prime your eyes (I used BareMineral PrimeTime)
3. Apply the first and third colors from the Revlon Illuminance Creme Shadow quad in Pink Petals all over your lids and up to the browbone as a sticky eyeshadow base and to give your lids a nice, pinky sheen.
4. Prime your lips by exfoliating, applying a lip balm, then your foundation and concealer to create a completely smooth, nude lip (check out my nude lip post for better instructions on this!).
5. Pat the eyelid color from Wet n' Wild's Color Icon Trio in Walkin on Eggshells all over the lid and up to the brow bone.
6. Apply BareMinerals Eyeshadow in Bikini all over your lid.
7. Apply any pencil eyeliner in a soft black, navy, or grey to your top lashline and 2/3 of the way in on your lower waterline.
8. Apply a white eyeliner to your innertear duct and the inner 1/3 of your waterline
9. Apply Victoria' Secret Beauty Rush eyeshadow in Gold Rush (wetten it to intensify the color) to your inner tear duct, over the white liner, bringing it almost 1/3 of the way into your lower lashline. Then use it to help highlight your browbone.
10. Use Covergirls Single Eye Enhancers in Swiss Chocolate and apply it very lightly to your crease, darkening when it comes to your outer corner (apply this quite lightly!)
12. Apply black mascara to both upper and lower lashes, and make sure it stands out. I used Maybelline's The Falsies.
13. Apply Almay's Smart Shade Blush in Natural to cheeks, then top with Bare Mineral's Bikini Eyeshadow (yes, on your cheeks!) mixed with a tiny bit of Bare Mineral's blush in Blushing Beauty.
14. Apply L'Oreal's Colour Riche Lipstick in Tickled Pink (it is a pinky-lavender color with a bit of shimmer) to your lips, patting to help create a matte stain sort of appearence.
15. Set quite lightly with powder if you wish, but do not use too much, you want to look dewy!
You're all set! I hope you try this out, and tell me how you like it!
Many more hugs&misses to come!
XOXO:
tu amie
Sephora Who?
It is the everlasting beauty question...
Can I get it cheaper?
Don't deny it, everyone has their favorite guilty pleasure expensive beauty item (Nars Turkish Delight Lipgloss anyone?) . Whether or not you have ever actually purchased this item, it still remains your true beauty love, the thing that you lust after, and when you do indulge, you feel rash and guilty everytime you use it. So allow me to let you in on a little secret: dupes.
Def: A less expensive, typically drugstore duplicate-hence the shortenend term, dupe- for expensive beauty products. They are everywhere. From CVS to Sally's, Ulta to Boots, Kmart to Giant you can find incredibly accurate dupes for your favorite expensive beauty products. The truth is, the expensive makeup and hair companies often use the same ingredients as your favorite drugstore brands. Still, with so many out there, it takes trial and error to find great dupes for your favorite products. It's a pain to have to buy and test tons of different products to find the right one. So, I've done the work for you! I've found great dupes for popular beauty products from each category (think lipgloss, blush, etc.) and I'm sharing my findings with you. Don't worry, dark chocolate makes a great thank you gift!
Makeup
Blush: Fave-Nars Orgasm ($26)
Dupe-Milani Blush in Luminous ($4-6)
Bronzer:
Eyeshadows:
Fave Brand: MAC ($15)
Dupe: Milani Shadows ($3-4)
Fave Brand: Stila ($22)
Dupe: Prestige ($3-4)
Fave: MAC Naked Lunch ($15)
Dupe: Wet'n'Wild Fine Wink ($1-2)
Fave: Stila Kitten ($22)
Dupe: NYX Champagne ($6-7)
Fave: Urban Decay Hotpants ($17)
Dupe: Prestige Love ($3-4)
Fave: Mac Woodwinked ($15)
Dupe: Milani Golden Bronze ($3-4)
Lipgloss:
Fave: Nars Turkish Delight ($24)
Dupe: Neutrogena Moistureshine in Groove ($6) is an absolutely incredible dupe (sorry about the close ups, they are on a medium toned model's lips):
It's pretty amazing, right?
Lipstick:
Fave: MAC Creme d'Nude ($15)
Dupe: Revlon Matte Lipstick in Nude Attitude ($6-7)
Foundation:
Fave: Studio Fix Fluid ($26)
Dupe: Revlon Colorstay Liquid ($8-10)
Eyeliner:
Fave: Mac Fluidline ($15)
Dupe: Wet n' Wild Megaeyes Creme Liner ($3-4)
I'm hoping this helps all you who are spending $24 on a lipgloss (which many have mentioned has a slight band-aid smell. Does anyone else notice that about Nars lipglosses? Love 'em to death, but...) when you could be getting practically the same gloss-even the packaging is remarkably similar-and saving yourself a crisp Andrew Jackson. So get out there and go dupe hunting! There's a dupe for practically every high-end makeup product out there, all you have to do is go find them!
Many more hugs&misses to come!
XOXO:
tu amie
ps: if there's any product you'd like me to find a dupe for just leave a comment below or send me an email at hugsandmissesbeauty@gmail.com !
Can I get it cheaper?
Don't deny it, everyone has their favorite guilty pleasure expensive beauty item (Nars Turkish Delight Lipgloss anyone?) . Whether or not you have ever actually purchased this item, it still remains your true beauty love, the thing that you lust after, and when you do indulge, you feel rash and guilty everytime you use it. So allow me to let you in on a little secret: dupes.
Def: A less expensive, typically drugstore duplicate-hence the shortenend term, dupe- for expensive beauty products. They are everywhere. From CVS to Sally's, Ulta to Boots, Kmart to Giant you can find incredibly accurate dupes for your favorite expensive beauty products. The truth is, the expensive makeup and hair companies often use the same ingredients as your favorite drugstore brands. Still, with so many out there, it takes trial and error to find great dupes for your favorite products. It's a pain to have to buy and test tons of different products to find the right one. So, I've done the work for you! I've found great dupes for popular beauty products from each category (think lipgloss, blush, etc.) and I'm sharing my findings with you. Don't worry, dark chocolate makes a great thank you gift!
Makeup
Blush: Fave-Nars Orgasm ($26)
Dupe-Milani Blush in Luminous ($4-6)
Bronzer:
Eyeshadows:
Fave Brand: MAC ($15)
Dupe: Milani Shadows ($3-4)
Fave Brand: Stila ($22)
Dupe: Prestige ($3-4)
Fave: MAC Naked Lunch ($15)
Dupe: Wet'n'Wild Fine Wink ($1-2)
Fave: Stila Kitten ($22)
Dupe: NYX Champagne ($6-7)
Fave: Urban Decay Hotpants ($17)
Dupe: Prestige Love ($3-4)
Fave: Mac Woodwinked ($15)
Dupe: Milani Golden Bronze ($3-4)
Lipgloss:
Fave: Nars Turkish Delight ($24)
Dupe: Neutrogena Moistureshine in Groove ($6) is an absolutely incredible dupe (sorry about the close ups, they are on a medium toned model's lips):
 |
| Nars Turkish Delight |
| Neutrogena Moistureshine in Groove |
It's pretty amazing, right?
Lipstick:
Fave: MAC Creme d'Nude ($15)
Dupe: Revlon Matte Lipstick in Nude Attitude ($6-7)
Foundation:
Fave: Studio Fix Fluid ($26)
Dupe: Revlon Colorstay Liquid ($8-10)
Eyeliner:
Fave: Mac Fluidline ($15)
Dupe: Wet n' Wild Megaeyes Creme Liner ($3-4)
I'm hoping this helps all you who are spending $24 on a lipgloss (which many have mentioned has a slight band-aid smell. Does anyone else notice that about Nars lipglosses? Love 'em to death, but...) when you could be getting practically the same gloss-even the packaging is remarkably similar-and saving yourself a crisp Andrew Jackson. So get out there and go dupe hunting! There's a dupe for practically every high-end makeup product out there, all you have to do is go find them!
Many more hugs&misses to come!
XOXO:
tu amie
ps: if there's any product you'd like me to find a dupe for just leave a comment below or send me an email at hugsandmissesbeauty@gmail.com !
Subscribe to:
Posts (Atom)